Scalloped Butternut Squash(es)

Inspiration for this recipe came on what turned out to be the only coolish October day we had in Los Angeles this year.  I was day dreaming about a particular butternut squash lasagna that we never seem to get around to making (probably because it feeds about 20 while exactly 2 people live in our house).

One thing lead to another which had me thinking about taking advantage of the unique shape of the butternut squash; specifically the long, solid neck.  It seemed to me that thinly sliced and arranged, butternut squash, with its quintessentially autumnal flavor, could be an attractive Thanksgiving side dish.

So I experimented.  One evening.  Which hopefully explains the awful lighting in these photographs.

And, while the aesthetic didn’t come out quite as planned (I had hoped the cheese and bechamel sauce would sink into the dish once again revealing the rosette…alas, not so much), it tasted fantastic. Topped with a sort of streusel of hazelnuts, bread crumbs and nutmeg, this rich side dish would pair delightfully with roasted turkey or other light meat (we ate it will grilled pork chops…also delightful).

Of course you could make this like a more traditional scalloped dish, by layering the squash horizontally in between layers of sauce and cheese.  By, why be normal?

Scalloped Butternut Squash(es)

The recipe below is based on arranging everything into a nine-inch quiche dish.  Go ahead and 1.5X or 2X if using a regular 9X13 casserole dish.

Ingredients

  •  1.5 lb butternut squash (find one with a nice long neck…it’ll make your peeling and slicing job easier)
  • 1 ounce of roasted hazelnuts, skins removed
  • 1 piece day-old bread made into crumbs (or 1/4 C of pre-made bread crumbs)
  • 2 TBS shredded parmesan romano cheese (use the good stuff)
  • 1/2-1 tsp ground nutmeg (or use fresh and microplane)
  • 1 tsp either dried sage or italian seasoning
  • 2 C whole milk
  • 5 TBS butter
  • 4 TBS flour
  • 4 ounces shredded gruyere cheese
  • salt and pepper to taste

 Directions

  1. Preheat oven to 375 degrees.  Place half-sheet into oven.
  2. Butter a 9-inch quiche dish
  3. Peel butternut squash (I prefer to use a pairing knife).  Cut the squash in two just above the bulb.  Halve both the bulb and the neck longwise.
  4. Slice each half into very thin half-moons.  I used a mandolin for this but you could also slice by hand. Set aside.
  5. Chop hazelnuts.  In a small bowl, combine hazelnuts, parmesan cheese, breadcrumbs, nutmeg and sage (or italian seasoning). Combine gently with fingers.
  6. Warm the milk in a small sauce pan.  Don’t let it boil.
  7. In a heavy-bottomed medium sauce-pan, melt the butter.
  8. Add in the flour and whisk constantly for about 3 minutes (until the flour no longer smells raw).
  9. Pour the milk into the flour mixture in a stream whisking the entire time.  The mixture will attempt to seize up during the first cup and then begin to loosen as the second cup is added.
  10. Bring sauce to a simmer, whisking and allow to thicken (2-3 minutes).  Remove from heat.  Add salt and pepper to taste.

Now you are ready to assemble.

  1. Cover bottom of quiche dish with sauce (about 1/2 C) followed by a thin layer of cheese (1/3 of the cheese)
  2. Starting at the outside, arrange butternut squash slices dome-side up overlapping.  You may want to start with the larger, hollow slices from the dome.  Continue overlapping the pieces as you work your way toward the center.
  3. Carefully pour the remaining sauce over the top of the butternut squash.  Be sure to distribute it evenly so that it gets in all the nooks and crannies.
  4. Top with remaining cheese and hazelnut mixture.
  5. Pull heated half-sheet from oven, place quiche pan in the half-sheet, cover with foil and reinsert everything into the oven.
  6. Let bake with foil on for 30 minutes.
  7. Remove foil and bake from 30 more minutes until the top of the dish is golden brown and sauce is bubbling.
  8. Allow dish to sit for 15 minutes before serving (to allow the sauce to thicken).


I’m not going to sugar coat it

Amber is our only entrant, so she automatically wins the sugar contest.  Since we’ve got about three weeks of baking left, I thought it would be fun to shift the focus to how close Amber gets.

Amber’s guess:

3 big Kitchen Gods plus 2 little Kitchen Gods or 925 ounces.

photo-31

Here is the current recipe tally:

  • 12 batches of assorted shortbread and sable doughs (that’s what all those paper towels rolls are)
  • 3X triple batches of curiously strong brownies (cut in half and stored stacked)
  • 2X batches of sugar cookie dough (not shown in photo)

Total ounces of sugar as of 11/19/13: 158.2


Ghosts of Halloween Candies Passed Blondies

It’s been two weeks to the day since Halloween.  Do you still have candy at your house?

Sadly, we did.

This Halloween marked the seventh spooky holiday we’ve been in our house.  And during this time how many trick-or-treaters have we had?  Exactly zero.  None.  Zilch.  Our little building is on a busy street and it’s gated–so, I don’t blame the kids for passing us up.  But, it makes me sad.  And I still buy candy each year hoping someone will find their way to our doorstep (and now I sound like the witch from Hansel and Gretel).

What does one do when left with a bowl of candy that, despite taking handfuls to work and consuming nearly as much, just won’t empty?  Why, you make ghosts of halloween’s passed blondies.

I completely admit, this is a bit of a hack recipe.  But, it works, it’s versatile.  And, I swear, if you throw in some Kit Kats, your life will be changed forever (I’m considering always using them in chocolate chip cookies going forward).

The recipe below is meant for a 9X13 inch pan.  Above I’ve done them in a half-sheet pan.  Both work.  To size-up, just increase all of the ingredients by half again (and, if you want to go the other direction with an 8X8 pan, just halve the recipe).

Ghosts of Halloween Candies Passed Blondies

Ingredients

  • 16 TBS/2 sticks unsalted butter at room temp.
  • 1 C golden brown sugar
  • 1/2 C granulated sugar
  • 1 egg + 1 egg yolk
  • 1 tsp vanilla
  • 2 C + 2-4 TBS all purpose flour, sifted
  • 1 tsp baking powder
  • 1 tsp kosher salt
  • 2 C candy, chops and/0r assorted chocolate chips (we’re talking chocolate varieties of candy here…gummy bears and twizzlers won’t work)

Directions

  1. Preheat oven to 350 degrees.  Line 9X13 pan with parchment.  Butter sides.
  2. In a medium bowl, sift together the flour, baking powder and salt.  Set aside.
  3. In a standing mixer using the paddle attachment (or hand mixer), cream together the butter and sugars until fluffy, about 3 minutes.
  4. Add-in the eggs one-at-a-time beating in between.  Then beat-in vanilla.
  5. Carefully add-in flour and mix on the lowest speed until the flour mixture is just incorporated.
  6. Pull-out bowl from mixer, remove as much dough from the paddle as you can.  Gentle fold-in candy and chocolate chips until evenly distributed throughout the batter.
  7. Spread dough into prepared pan.  I like to use an off-set spatula.  To keep the parchment in place, it helps to keep an index finger on the opposite corner of the inside of the pan (holding down the parchment) while spreading in the opposite direction.  Be patient, the dough will eventually settle into the pan.
  8. Bake for 30-40 minutes or until the tops are light golden brown (I start checking at about 30).
  9. Allow pan to cool completely before cutting.  I’m serious.  No cheating.  Make sure the bottom of the pan is at room temp. before cutting into these things…otherwise you risk having or bars fall apart.


Give me some suga’!

This year,  the ceremonial holiday baking honey badger did not see his shadow on November 1st, signaling an early start to the baking season.

My excel workbook has been developed and the calendar is populated.  I don’t know about you, but I had so much fun with last year’s guess the butter contest that I thought I’d bring back a similar challenge this year.

Only with sugar.  

Sugar sources include granulated (I use superfine), brown (packed) and confectioner’s.  It does not include sanding sugar used in decorating.  But does include sugar used in icings and frostings.

I decided to use ounces as the unit of measure because volumetric measurements can be deceiving.  Whereas, an ounce is an ounce is an ounce.

If you are like me and need a little conversion to contextualize the measurement (to this day when someone talks yardage, I have to first convert whatever number it is into short-course pool lengths before it has any meaning to me), I give you the relative half-cup-to-ounce ratios for my own kitchen scale:

photo-28

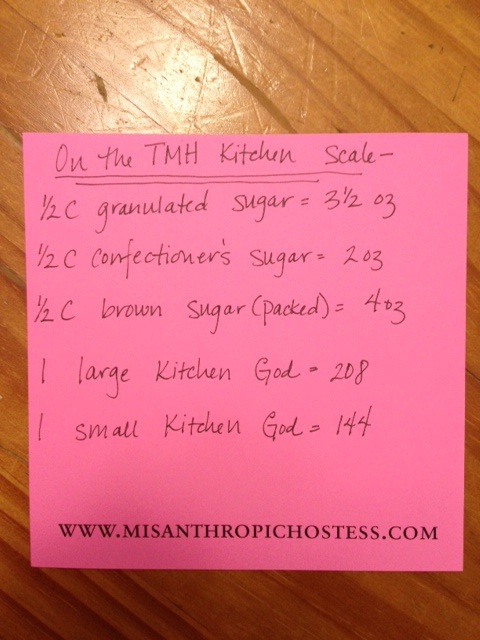
Remember, 1 pound is 16 ounces.

I’ve got a couple of clues to help inform your guesses:

  1. Everything I’m making includes at least one form of the sugars list above.
  2. I have 14 different treats planned for this year.  This includes at least two frosted/iced items and three items I consider “candy” where the sugar-to-other ingredient ratio is higher than, say, shortbread.  Oh, and one item gets rolled in additional conferctioner’s sugar post-production.
  3. While this number is relatively meaningless without naming the actual baked goods to be made, the estimated total number of units is about 2,000.

Want to play along for a prize?

  • I will update the total of number of ounces each Tuesday beginning next Tuesday, November 19th continuing with the grande finale on Tuesday, December 10th.
  • To be entered into the running, you must add your guess in the comments section in total ounces by midnight next Monday (November 18th).
  • The closest guess without going over will get an extra batch of baked goods; winner’s choice.


Cake Apple

I ran across this recipe on Sunday morning while perusing Dorie Greenspan’s Around My French Table.

Simple and rustic, the batter in this recipe serves only to keep the apples together.  Dorie suggests using a variety of apples and, so I did, throwing in a granny smith, fuji, braeburn and even a honey crisp.

The only spring form pan I have is fit for a giant at about 10 inches.  For a deeper cake, I’d reccommend going with an eight-inch pan.

Perfect with a scoop of ice cream or drizzle of cream anglaise and caramel sauce, this gateau would be lovely for Thanksgiving.  Or a brunch. Or, just because.  One word of caution: this cake is so full of apples that the moisture begins to transform this baked good into a pudding by the next day.  So, I think it is best served that same day it is baked.

If you like this, you might like these

Russian Grandmother’s Apple Pie Cake

Misanthropic Hostess Apple Pie

Marie-Helene’s Apple Cake

as appeared in Around by French Table by Dorie Greenspan

Ingredients

  • 3/4 C all-purpose flour
  • 3/4 tsp baking powder
  • pinch of salt
  • 4 large apples of mixed variety
  • 2 large eggs
  • 3/4 C sugar
  • 3 TBS dark rum (or sub-in 1 TBS vanilla extract)
  • 1/2 tsp pure vanilla extract (omit if not using rum)
  • 8 TBS (1 stick) unsalted butter melted and cooled

Directions

  1. Center rack in oven and preheat to 350 degrees.  Butter 8-inch springform pan.  Line baking sheet with parchment paper.  Set springform pan on top of baking sheet.
  2. Whisk together the flour, baking powder and salt in a small bowl.
  3. Peel and core apples.  Cut into 2-inch chunks.
  4. In a medium bowl, beat the eggs with a whisk until foamy.  Pour in sugar and whisk for a minute to blend.  Whisk in rum and vanilla.
  5. Whisk in half the flour mixture until just incorporated.  Whisk in butter.  Repeat these two steps with the remaining flour and butter.
  6. Switch to a rubber spatula and fold-in the apples making sure each piece of fruit is covered in batter.
  7. Scrape mix into prepared pan and push around the apples until you have an evenish layer (evenish is Dorie’s word…this is why I love her so much).
  8. Slide the pan (still on the baking sheet) into the oven and bake for 50-60 minutes until the top of the cake is golden brown and a knife, inserted deep into the center, comes up clean.
  9. Transfer to a cooling rack and let cool for 5 minutes.
  10. Carefully run a blunt knife around the perimeter of the cake and remove springform, making sure to open it slowly so that no apples stick to it.


Merry, bright and all that jazz

photo[1]

And so it begins my friends.  We’ll kick off this party for reals on Tuesday with a new holiday baking contest and more frequent posts.  Yes, I did hide the actual names of the treats.  And yes, I did map out what they will look like so that the array is aesthetically pleasing.  Pshah!

Before that, I thought I’d share what the next five weeks looks like around here.

photo[2]