French Macarons, part I of ???

I had no idea. Really, I didn’t.

What began as a (self-deemed) creative attempt at gift giving has turned into a burgeoning obsession. The French macaron. How I hate thee. And love thee. And hate thee. To make matters worse, the little buggers have begun to show up everywhere. Haunting me. Whereas months ago I’d never even seen one outside of the recipe books, they’re now stalking me from magazine covers, bake shops and Starbucks. That’s right, Starbucks is selling them. Sheesh.

And they aren’t cheap. There is a store in Beverly Hills that only sells French macarons. The price: $1.60 a piece. This has me knocking my head against the wall and (not for the first time) asking myself…why…why did I not think of this 12 months earlier? I’d have the market cornered and  would certainly be well on my way to appearing in the Forbes top gagillionaires under 40 list.

But, I didn’t. And so I probably won’t.

Here is how my relationship with the French macaron began. Over the summer I read David Lebovitz’s The Sweet Life in Paris http://www.davidlebovitz.com/books/. Now, I don’t know where Mr. Lebovitz has been all my life, but man, I’m glad he’s in it now. If you don’t already know (and you probably do), he was a pastry chef at Chez Panisse and now lives in Paris and writes cool cookbooks and a really funny blog http://www.davidlebovitz.com/. The Sweet Life is sort of a living memoir with recipes. And, as soon as I read it, I knew I had to give it as a holiday gift. What better to pair the book with than with a bag of the quintessential French treat (and there is a recipe for them in the book), that’s right, le macaroon Françoise (made by me of course).

Ha!

Are you getting the feeling that my seminal adventures with this sandwich cookie may not have been entirely successful?

Turns out, there is a reason that little shop sells them for nearly two dollars each. Much like the Parisians themselves (yes, I am about to stereotype), they are fussy, finicky and rather unpredictable. But, I’ll admit, also like the city of lights and its culture, the entity (when it does turn out) is worth the hassle.

So, this is my first of who knows how many posts on French macarons. I am determined to get them right. And, I am determined to try each and every flavor (except for the ones I don’t think I’ll like because, really, what would be the point?). Right now, my success rate is about 50%–but I promise to share my successes and failures along the way.

To start, this recipe calls for not only a food processor but also a standing mixer (or some really strong biceps that can create stiff peaks with a whisk). The recipe also necessitates a pastry bags and tips. This is indeed a gadgety recipe.

Next, you make your own flour. Yep, flour from blanched almonds. Using food gadget #1, the food processor (mine’s named Bertha), grind the almonds into a powder. You want the mixture to be super duper fine. I got it as fine as I could. I’ve recently read that you should sift the flour a couple of times after grinding. I’ll try that next time and report back.

To continue with a theme, you then grind together the almond flour, confectioner’s sugar and cocoa.

So as not to make the standing mixer jealous (yes, this too has a name: Marta), egg whites are whipped into lovely silky peaks. A couple of my batter attempts turned out very dry (more on this later). In retrospect, I think I must have over-whipped the egg whites and sugar.

Once you’ve got peaks, very carefully fold in the dry mixture. I’ve read that the resulting batter should act like lava. Indeed, I believe this is an apt description. The batter is definitely liquidy but also has a certain viscosity.

Once you’ve corralled the batter into a pastry bag, pipe disks onto parchment-lined baking sheets. And, into the oven they go. But wait, there seems to be some speculation on whether to let the raw batter harden some before going in to the oven. I think this may make a difference if you live in a humid environment. In dry Southern California the disks were already beginning to harden as I finished each sheet.

Remember my mention of  over-whipping the eggs whites.? Look at the picture below, specifically the, uhm, piles ones on the right. What do they look like? Uhhuh. On the over-whipped batch they piped out in coils and baked in the same form. My husband was incredibly amused and I apologize to anyone who may have been the recipient of a “liberated” french macaron.

Done right, the cookies have “feet” and do not crack or split across the top. Lets talk about the feet first. Take a look at the picture below. See the little base at the bottom? Those are feet. If your cookies crack, they won’t grow feet. And apparently that is a major macaron faux pas.

Through trial and error I discovered that I could only use the top rack in my oven. Lower racks caused the cookies to crack.

After they are nice and cool, you marry up the halves. Fill them (this time around I used a chocolate ganache–though not the one David Lebovitz has with his recipe).

Et voila, you are one step closer to speaking French.

From The Sweet Life in Paris (Broadway) by David Lebovitz

http://www.davidlebovitz.com/archives/2005/10/french_chocolat.html
Batter

  • 1 cup (100 gr) powdered sugar
  • ½ cup powdered almonds (about 2 ounces, 50 gr, sliced almonds, pulverized)
  • 3 tablespoons unsweetened Dutch-process cocoa powder
  • 2 large egg whites, at room temperature
  • 5 tablespoons granulated sugar

Preheat oven to 350º F .
Line two baking sheets with parchment paper and have a pastry bag with a plain tip (about 1/2-inch, 2 cm) ready.
Grind together the powdered sugar with the almond powder and cocoa so there are no lumps; use a blender or food processor since almond meal that you buy isn’t quite fine enough.

In the bowl of a standing electric mixer, beat the egg whites until they begin to rise and hold their shape. While whipping, beat in the granulated sugar until very stiff and firm, about 2 minutes.
Carefully fold the dry ingredients, in two batches, into the beaten egg whites with a flexible rubber spatula. When the mixture is just smooth and there are no streaks of egg white, stop folding and scrape the batter into the pastry bag (standing the bag in a tall glass helps if you’re alone).
Pipe the batter on the parchment-lined baking sheets in 1-inch (3 cm) circles (about 1 tablespoon each of batter), evenly spaced one-inch (3 cm) apart.
Rap the baking sheet a few times firmly on the counter top to flatten the macarons, then bake them for 15-18 minutes. Let cool completely then remove from baking sheet.

Match up pairs and fill with ganache.

Chocolate ganache (recipe by Martha Stewart)

note: I used this recipe not because I don’t like Mr. Lebovitz’s but because I had made this ganache recipe a couple of days before for sundaes and just tripled the batch at the time…you know, kill a couple of birds with diabetes at once.

  • 4 cups heavy cream
  • 2 pounds best-quality semisweet chocolate, finely chopped
  • 1/4 cup light corn syrup
  • 1/4 teaspoon salt

In a small heavy sauce pan, bring cream to boil over medium heat. Remove from heat and add chocolate, swirling the pan so the chocolate is completely covered. Wait a couple of minutes and carefully mix the chocolate and cream together with a spatula. Mix in corn syrup and salt. Transfer to a clean bowl and refrigerate until the consistency of fudge (this makes filling the cookies easier).

Whoopie [sic] for Devil Dogs

I lost a bet.  It had to do with a football game between the college I went to and the college where I work.  And, unlike a certain coach who not only allowed—but celebrated a very un-sportsman-like play in the last 44 seconds of said game, I am always a good sport.

Of course, the wager was for baked goods.  With the veritable deluge of work-related holiday parties, potlucks and general food-related merriment, it was decided that I would not pay up until the actual week of Christmas.  My original plan was to bring in red velvet cupcakes.  However, I’d already made several batches for other events by the time it came to pay up and though I never I’d say this, I was red-velvetted out.

In looking through my very ratty book of recipes for something “new,” I came across a childhood favorite that just felt like the perfect pay-off for my ill-fated bet.

The Devil Dog.  At least that’s what they are called where I come from.

Until this blog post, I had no idea where the name “devil dog” came from.  Though, I’ve always had a romantic notion that they were named after a fierce yet amiable squad of WWII bombers who ate them for good luck before each mission.

A quick Google search revealed a significantly less interesting explanation.  There is a snack cake company in New Jersey called Drakes Cakes; maker of the original yodel and ring ding.  According to its website Drakes Cakes has been giving Little Debbie, Hostess and even Tastykake a run for their money for over 100 years.  Drake happens to make a treat called a devil dog (which coincidentally also looks a lot like a Suzy Q).

So, I’m guessing that the recipe I have must have originally been a homemade version of the Drakes Cake devil dog.  However, somewhere along the way something must have gotten lost in translation because while the original devil dog was meant to look like a hot dog, the ones we grew up with look a lot more like hamburgers.

This recipe is very similar to an array of whoopee pie and giant oreo recipes I’ve seen floating around.  The truth is, it really doesn’t matter what they are called because what they are is pretty darned delicious.

Yes, this recipe calls for marshmallow fluff.  It’s creepy and yet invitingly soothing at the same time.

The cake will rise to look like little burger buns.

Once the cakes are cool and the filling is made, match up the halves and give half of the halves a hearty dollop of filling.  Watch out–this stuff is sticky.  Super sticky.  I despise sticky stuff and so used my trusty scooper to minimize having to touch the bionic super fluff.

Top each half with its mate and you have a devil dog. Or a whoopie pie.  Or a giant oreo.

Devil Dogs

This recipe is adapted from my original since the original calls for…gasp…boxed cake mix.  The recipe below is a mash-up between my original and a July 2009 Gourmet Magazine recipe for whoopie pies.  Also, the original recipe calls for each half to be made from ¼ C of batter.  This yields a ginormous “dog” that really is too big to eat as a snack.  I prefer to use my handy one-ounce scooper.  Even then, this resultant has about as much cake and “frosting” as a regular-sized cup cake.

Makes 20 if using 1 ounce scooper, 10 if using ¼ C

Preheat oven to 350 degrees

For the Dog (cakes)

  • ½ C unsalted butter, room temp.
  • 1 C packed golden brown sugar
  • 1 large egg, room temp.
  • 2 C sifted all-purpose flour
  • ½ C cocoa powder (man-up and use the good stuff)
  • 1 t kosher salt
  • 1 C room temp. dairy (you can use buttermilk, whole milk…or even egg nog as I used for the bet)
  • 1 t vanilla

For the Devil (filling)

  • ½ C unsalted butter, room temp.
  • 1 ¼ C confectioners sugar, sifted
  • 1 14oz container marshmallow fluff
  • 1 t vanilla

Sift together dry ingredients. In a separate bowl, cream butter and brown sugar with standing or electric mixer until light and fluffy (3-5 minutes).  Beat-in egg and vanilla.  Reduce speed to low and add dry ingredients and buttermilk in alternating batches (start and end with dry ingredients).  Mix until smooth, scraping down sides along the way.

Using 1-ounce scooper or ¼ C., scoop level amounts of batter onto a parchment-lined baking sheet, 1-2 inches apart.  Bake until tops are puffed and spring back when touched (10-15 minutes).

For filling, beat together butter, sugar, marshmallow fluff and vanilla in standing mixer or with hand-held mixer until smooth.

Note, the filling is very, very sticky you may want to refrigerate the filling for half an hour before putting the dogs together.  If you are working in a warm kitchen, you may also want to stick the completed batch in the fridge to firm up.

The many aliased Chocolate Peanut Butter Bonbon

AKA: White Trash Bon Bons

AKA (if you are my husband): Pete’s Schweedy Balls

When I was a kid, my mom only made these babies during the holidays. Once made, she would horde them in a very miserly and un-holiday-like fashion, dispensing them one at a time and only to those she deemed deserving. This may sound strange at first because a quick look at the ingredient list doesn’t hint at anything special. If anything, it suggests (at least to me) one of those strange recipes only found in Reader’s Digest and only ever made by grandmothers (you know, like chocolate covered chow mein noodles or green salad in a jello mold). This is where the first AKA name comes from. The second AKA is a reference to a very funny, very perverse Saturday Night Live skit with Alec Baldwin and those naughty, naughty NPR ladies on the Delicious Dish.

Something cool happens when the melted peanut butter and butter (that’s right-BOTH) melds with the rice crispies and diabtes inducing amounts of confectioners sugar. I’ll be honest, these are a little labor intensive and are best made with some patience over a couple of days. But, they aren’t hard and, if you like chocolate and peanut butter together, they’re worth the effort. Another bonus: they don’t really go stale. After the chocolate has completely and totally tempered (seriously, like, entirely, trust me), store them in an air-tight container or freezer bag and they’ll be good through New Years. If they last that long. Ha!

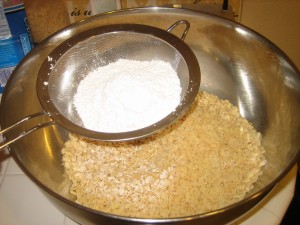
First, get the biggest bowl you have. The recipe below is doubled but take my advice, bigger is better here.

IMG_8847

Once the peanut butter and butter are melted and molten hot, carefully add to the dry mix.

IMG_8853

Make a marginal effort to mix this up with a spatula and then abandon ship and just do it with your (clean) hands. Remember, this stuff is hot at first. Mix until everything starts to clump together. If, even after thorough mixing the “dough” is very dry, feel free to melt some more butter and add. I won’t tell anyone.

IMG_8856

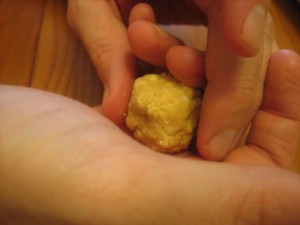
Now you are ready for balls. I like mine to fit into cute little wrappers so I weigh out each ball at 1/2 ounce. For this phase, the work is made easier if you have two people: one to measure out portions and the other to form the balls. In the photo below, my husband is playing the role of hand model. Luckily, he works for peanuts (or, in this case, peanut butter).

IMG_8861

Once you’ve formed all of the “dough” into balls, line them up in a single layer on a cookie sheet or two, cover with plastic wrap and refrigerate over night.

IMG_8866

Now for the dipping. You’ll need a double boiler. I know that they actually sell pots called “double boilers” but the truth is, a stock pot and large glass bowl work just as well. If you’ve never used a double boiler, just add a couple of inches of water to the bottom of the stock pot and fit the bowl over. You want the water to simmer but not boil.

A note here on chocolate. I like to use chocolate chips for a  chocolate coating. They come with a stabilizer in them that helps them keep their cute little chip shape when baked. This also comes in handy when using them as a candy coating because the stabilizers will help keep the candy form once it has hardened. You could also use dipping or molding chocolate  here as well.

IMG_8872

As the chocolate melts, gently stir. When melted, the chocolate will be too thick to properly dip your balls into. So, you are going to want to thin-out the melted chocolate with vegetable oil. This isn’t as weird as it sounds. In fact, if you’ve ever been to an event with a chocolate fountain (or if you have one at home like my friend Amber), they use the same process to get and keep their chocolate flowing.

I don’t have use a standard amount of oil. I just add it a tablespoon at a time (incorporating in between) until the chocolate is smooth and runs off the spatula in a thick by steady (ie, not gloppy) stream when lifted out of the chocolate.

IMG_8879

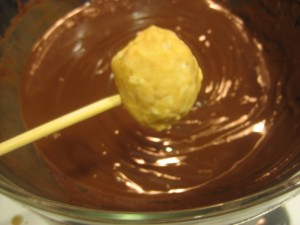
Now, take a deep breath. The next part isn’t as scary as it seems. To dip the balls, I like to use wooden bamboo skewers (the kind you use for BBQ kabobs). I spear a ball with the sharp end and insert it just far enough that the ball feels stable (maybe 1/8 “).

Next, I quickly dip the ball and cover it in one swoop. I then let it drip over the bowl and use an additional bamboo skewer to help set it on a parchment-lined cookie sheet. My mom uses spoons with successful results. Try a few methods and find one that works for you. This phase takes some patience. It takes me about an hour to dip a batch (70 or so) balls.

IMG_8883

IMG_8889

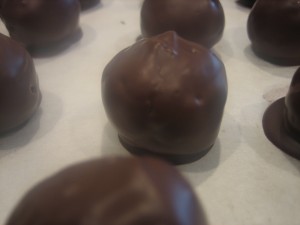
Now, set the dipped balls in a cool, safe place and let them set-up and temper over night. As they harden, their appearance will change from shiny-wet to a nice soft sheen.

IMG_8892

And now, you’ve got peanut butter bonbons and the world at your feet.

IMG_8902

Chocolate Peanut Butter Bonbons

Makes about 70 ½ ounce balls (before they are dipped in chocolate)

2 C peanut butter (smooth or creamy)

.5 C Butter

3 C sifted powdered sugar

4.5 C rice crispies

12-24 ounces semi sweet chocolate chips

Wooden kabob skewers (available at the grocery store)

To make balls

Melt together peanut butter and butter. Meanwhile, in a large bowl (largest you have), sift in powdered sugar. Add in rice cripsies and combine. Once peanut butter and butter mixture is melted and combined, pour over sugar and rice cereal. Using an oiled spatula, fold mixture until combined (it will be hot, but this is sometimes easier to do with clean hands). The mixture will be crumbly and if it is too dry, melt additional peanut butter and add until dough comes together.

Using a 1 ounce scoop or spoon, form into balls. Place balls onto a cookie sheet or large plate and refrigerate at least two hours (I just do it over night).

To dip in chocolate

Melt chocolate chips in a double boiler. Add oil as needed until chocolate is melted but consistency of hot fudge (not too runny, not too gloppy). To dip balls, spear one about ¼ way through with a wooden skewer. Quickly dip it in the chocolate to the entire ball is covered. Hold over chocolate and let extra chocolate drip back into the pot.

Set aside on parchment lined cookie sheets or plates to harden.

Notes:

For a firmer chocolate shell, you can add a stabilizing ingredient to the melted chocolate (such as paraffin or uncolored unscented candle wax). The chocolate will already have some stabilizers in it if you are using chocolate chops but adding the additional wax will help them harden.